1. เข้าไปตั้งค่าใน Windows Firewall ให้ Allow App Remote Desktop
1.1 Control Panel --> Windows Firewall
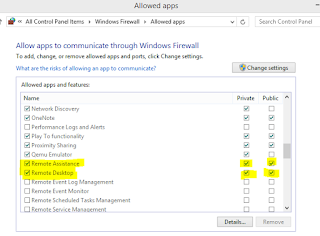
1.2 คลิกลิงค์ Allow an app or feature thorough Windows Firewall ด้านซ้ายมือของหน้าต่าง Windows Firewall
1.3 เลือกหา Remote Assistance และ Remote Desktop ติ๊กถูกในช่อง Private และ Public
2. เปิด Run แล้วพิมพ์ในช่อง gpedit.msc แล้วกด OK
3. จะขึ้นหน้าต่าง Local Group Policy Editor
4. ให้เข้าไปที่ Computer Configuration > Administrative Templates > Windows Components > Remote Desktop Services > Remote Desktop Session Host.
5. ที่โฟลเดอร์ Security คลิกเข้าไป แล้วเลือก "Require use of specific security layer for remote desktop (RDP) connection" เลือก Enable และ RDP ในช่อง Option แล้วกด OK
6. ที่ "Require user authentication for remote connections by using Network Level Authentication" เลือก Disable แล้วกด OK
7. ออกจากโปรแกรม แล้ว Restart เครื่อง
8. ทดสอบการ Remote โดยใช้เครื่องอื่น Remote เข้ามายังเครื่องที่ติดตั้ง Windows 8.1
Web Reference http://kb.mit.edu/confluence/display/istcontrib/Establishing+an+RDP+connection+with+a+Windows+8.1+client+from+Mac+OS+X